
Good afternoon musicians!
As we are all sitting inside our houses, I am CERTAIN that
many of you have decided that NOW is the time to practice, practice, practice!
There is no better time to get some more literature under your belt, prepare
your scales for the next district or state audition that comes up, or just keep
your chops loose and maintain your skills!
As such, I thought it would be a good idea to share some
basic maintenance and repair tips to keep your stringed instrument in top
playing condition. Proper maintenance and care will allow your instrument to
perform at its best, and will prevent unnecessary trips to the repair shop
(which is good, because they are all closed right now!).
Storage
Let’s start with storage of the instrument. If you are not
going to play for a while, the best and safest place to keep your instrument is
in its case. The case is designed to protect the instrument against moderate
bumps and knocks and will keep the instrument in great shape. It is very important
to keep the following points in mind regarding your case:
- Make sure your case is the right size for your instrument. Storing a 3/4 violin in a case meant for a full size instrument, or keeping a violin in a case meant for a large viola is just asking for trouble. The case must fit the instrument snugly to prevent extra movement. If you bought your instrument as an outfit at a music store, this shouldn’t be an issue. However (unlike band instruments) string instruments are often purchased separately from their case. Make sure your instrument and case are “made for each other!”
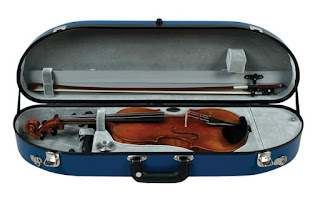
- Remember that your case is meant for your
instrument, bow, and specific accessories ONLY! Many cases (such as the plastic, shaped case that many beginner instruments arrive
in) are designed to hold ONLY the instrument, bow, and a cake of rosin. Here is
an example of such a case:

- Some cases have an additional spot to store a
shoulder rest. Still others (like larger oblong cases) provide space for all of
those accessories, plus a pocket for music, cell phones, etc. Here are a couple
of examples of these cases:

- Whatever case you have, ONLY store in it what it was designed for. Because the case was designed to protect your instrument, forcing other items inside will inevitably damage it. We have seen cases where music books, clothes, you name it, were forced into a case, and caused damage. The damage can be a simple as scratches in the finish, breaking the bridge, or causing dents and cracks in the top of the instrument. PLEASE: only your instrument in the case!


This article from Strings Magazine also provides good
guidance for choosing a case: https://stringsmagazine.com/the-violin-case-buyers-guide/
If you will be practicing your instrument a lot (and we all
hope that’s the case!), then a stand or hook might make sense in your practice
area at home. There are lots of good choices, but my favorite are the Ingles stands. They are made for violin, viola, cello and bass, are very sturdy, and
very stable. In addition it features a “lock” to hold the instrument in place,
as well as hook for your bow. This makes it very easy to simply pick up your
instrument and start playing. Here is what it looks like:

For violins and violas, wall hooks are available, and even a hook that will mount to a music stand! Beware of pets
and smaller siblings, but if you have a secure area to practice, a stand or
hook is an excellent way to keep your instrument at arm’s reach.

Store the instrument indoors, in a temperature-controlled
environment. While extremes in heat/cold and dry/humid conditions can damage
wooden instruments, what is really damaging is rapid and/or repeated
changes in these conditions. If your school orchestra room is kept very cold,
and your home is relatively warm, you probably won’t experience too many issues
as you bring the instrument back and forth. This is because the changes are
gradual, and the instrument has time to adapt. Try to avoid keeping your
instrument in a cold car trunk, or warm garage. As long as you keep your
instrument with you, you will avoid many of these issues.
Handling and Transportation
Handling of your instrument is pretty straightforward. Be
careful with it, but don’t be afraid to treat and use it as a musical
instrument. When not being played, it should be in rest position. Don’t balance
it on a music stand or chair. If you need to leave your practice/rehearsal
space, place the instrument on a stand or in its case.
Transporting the instrument is similarly easy: try to keep
the instrument in the same environment that you will be in. If you are in a car
on a very hot or cold day, keep the instrument in the passenger compartment or
other climate-controlled part of the vehicle. Cellos and basses may be laid
flat, but can also be transported upright if the case is secured. When securing
a case to a vehicle, take care not to put straps around the instrument,
stressing the strings and bridge. It is best to secure the case to the vehicle
with straps, and make sure the instrument is secure in the case.
When shipping instruments, pack the instrument securely in its case, secure the bridge and scroll,
then pack the case in a sturdy carton large enough for fill/padding on all six
sides. Tape securely, and ship with a reputable shipper. Robertson & Sons Violin
Shop (http://www.robertsonviolins.com/)
does this as a matter of course, and they have an excellent video here showing
how to ship your violin safely: https://www.youtube.com/watch?v=dViKEekWDXg
Maintenance

There are very few true do-it-yourself repairs that can be
done correctly without special training, but basic maintenance is relatively
simple, and will prevent the need for many repairs. Let’s take a look at a few:
· Let’s start with the basics: the strings.
The instrument should be strung properly, with proper tension. The string should sit securely in the
groove meant for it on both the bridge and the nut, and should be coiled around
the peg neatly. The strings should NOT cross each other in the pegbox.The strings should be cleaned of excess rosin after playing. This can
be accomplished simply by rubbing them with a clean untreated cloth until the
rosin is removed. Leaving the rosin to build up on the string will deaden the
sound, and lessen the useful life of the string. Strings should be changed one
at a time! Removing all of the strings at the same time will result in the
bridge, and probably the soundpost falling as all of the tension is removed. This
article from Violin Restorer has good instructions and pictures to help you out:
https://www.violinrestorer.com/2017/03/06/change-strings-violin/
- · The bridge[CD9] is custom cut and fit to your instrument. It cannot be swapped with another, and you cannot buy one “ready made” at a store. (More on this below) If the bridge is knocked out of place, or falls, you can reset it yourself. It should be stood up in the center of the instrument, the feet of the bridge aligned with the notches in the F-holes. There should be no space between the feet and the top. When in doubt, take the instrument to a repair shop for proper placement.


- · Pegs must fit the instrument exactly. Pegs must be cut to fit your instrument[CD10] by a luthier: they cannot be purchased off-the-shelf ready to use. The peg is tapered: thinner at the end, and gradually growing thicker down its length. The peg box holes must be similarly tapered. This taper is what allows the peg to “lock” in place after tuning, yet remain adjustable by hand. The peg should be clean and turn easily when adjusted. If there is difficulty in turning the peg, a SMALL amount of “peg dope” can be applied to the peg before it is reinserted. The secret ingredient used in our shop? Lava soap! Use a SMALL amount, just enough to lubricate the peg. Remember, it’s easy to add a little more, but darn near impossible to remove it! NEVER force a peg that will not turn, and NEVER let Dad near it with his pliers! The locking power of the taper is considerable, and the peg or worse, the peg box or neck will break before the locked peg will. If a peg is hopelessly stuck. Take it to your local repair shop and leave it to a pro!

- · The chinrest is a personal choice. Several different types exist, and one should be chosen that is comfortable for you. The chinrest[CD11] may be removed fairly easily by using a special “key” on the barrel screws. Insert the key into the hole, and turn the barrel counterclockwise to loosen and remove. Do not push the key too far in, or it may emerge from the other side and scratch/damage the finish as you turn it. For this reason, we don’t recommend using a paperclip (though it will fit!) for this purpose.
- · The tailpiece is made of plastic, wood, or other composite material. It usually has spaces for 1 to 4 fine tuners, or it may have the fine-tuners built in. When all of the strings are removed, the tailpiece can be removed by slipping it over the end button. However, because this involves removal of all of the strings, and proper adjustment of the tailgut (to make sure the tailpiece ends up in the right place!), we recommend that you leave this job to a professional.
- · The neck, fingerboard, and nut require very little maintenance, with the exception of removing rosin from the fingerboard after playing. If done immediately after playing, this can be accomplished with a clean cloth at the same time you clean the strings. If you are a newer player, and your instructor wants you to use tapes or other markers on the fingerboard, there are several commercial solutions available. Additionally, pinstripe tape (found at auto supply stores) is the traditional standby, as are paper hole “reinforcements” or other stickers. Your instructor should install these so that they are in the correct place. Upon removal, cleaning of the glue from the fingerboard is necessary. A citrus-based solvent, such as “Goo Gone” will work to do this. However, care must be taken to not get any on the instrument itself, as it may damage the finish.
- · The finish of the instrument can be kept in top shape with care and careful handling. After playing, excess rosin should be wiped off of the instrument with a clean cloth. NEVER use any alcohol-based solvents on your instrument: it will strip the finish/varnish from the wood. There are commercially available polishes available at your music store. These should be used VERY sparingly to spot clean areas of the instrument. You should never slather your instrument in polish. It’s not like waxing a car!
- ·
The bow should be handled carefully, and not whacked against objects, nor dropped. The stick can be quite fragile, and if it is broken there is no repairing it: it must be replaced. Always loosen the bow hair after playing, and don’t touch the hair with your fingers: oils from your skin will both attract dirt and grime, and[CD12] damage the hair. If a hair (or more!) break while playing, simply CUT them near the end with a small scissors. Do NOT rip them out. Each time you do this, you loosen ALL of the hair at that end of the bow, which will necessitate a complete rehairing sooner. This article from our friends at The Long Island Violin Shop goes into detail on the subject: https://www.liviolinshop.com/blogs/the-long-island-violin-shop-blog/knowing-when-its-time-to-rehair-your-bow


Repairs
All of the repairs in this section MUST be done by a
professional: a trained luthier with experience working on and with stringed
instruments.
- · Bow rehair. This is a very simple job for an accomplished luthier to perform. The cost is usually reasonable, and can be completed fairly quickly. When your bow hair is dirty, worn out, or falling out, it’s time for a rehair!
- · Soundpost reset. The soundpost is held in place by the tension of the instrument only: no glue! It must be cut to the proper length by hand, and the cuts must be angled to match the contours of your instrument exactly. It must then be inserted in the proper place near the treble foot of the bridge, by inserting it thru the F-hole. It’s a tricky operation, one that is very difficult for a novice to get correct. You will be astounded how quickly a trained luthier can do this job!
- · Bridge fit and/or replacement. As mentioned earlier, placing a properly cut bridge isn’t too difficult, and can be done with practice. However, if your bridge breaks or needs replacing, this job MUST be done by a trained luthier. The reason is pretty simple: no two bridges are alike, because no two violins are alike. The contours of the top of your instrument are unique. In order for proper sound/vibration transmission to take place, the feet of the bridge must match the contours of the top exactly. A luthier will cut/sand your bridge to ensure proper fit. In addition, string height is unique from instrument to instrument, and this is determined by the bridge as well. A luthier will cut and shape your bridge to get the proper height. We cannot overstate this: a bridge MUST be done by a luthier. There is no such thing as an off-the-shelf, standard bridge that you can purchase and fit yourself.
We hope that this article has been helpful! If you have
anything to add and/or comment on, please visit our Facebook pages and let us
know!
Happy playing!
Chris, at home.
No comments:
Post a Comment